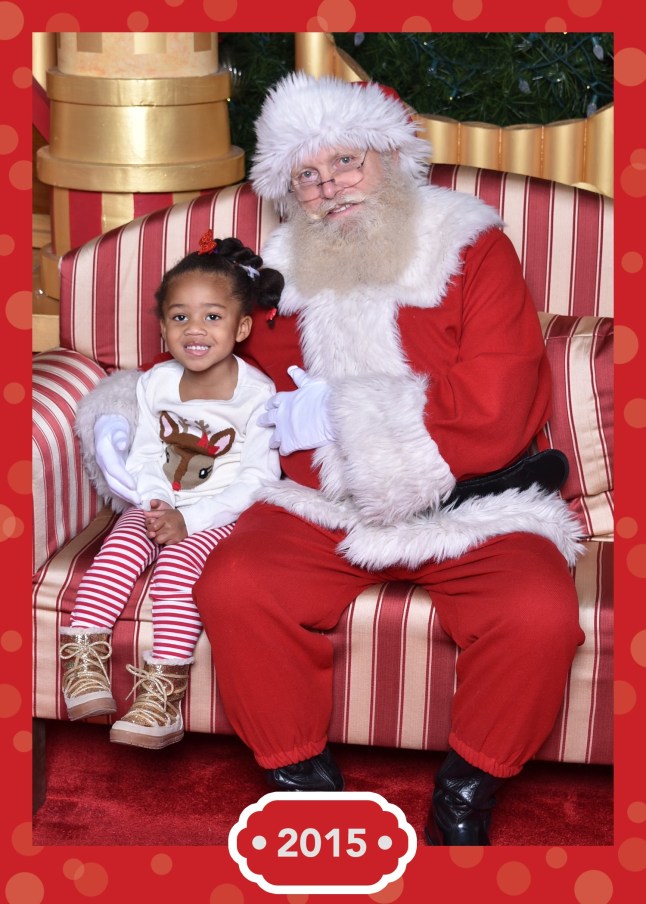
Time for a check-up! My Daughter’s first visit to the dentist

2015-11-16 09.41.19

Quinn showing the dentist how to brush the dinosaur’s teeth

Though it is not uncommon for children and even adults to fear the dentist, I’ve always looked forward to my appointments, especially when I was younger and received a prize for doing a good job brushing my teeth. However, since my daughter turned one and had almost all of her teeth except the back molars, I prolonged the inevitable: her first dental appointment. As a result of her experiences with doctor’s visits which usually involved vaccinations, Quinn would often become quite distraught when she would see the doctor headed her way, regardless of how friendly he was. Now that my little one’s back molars came in months ago, I knew I had to make an appointment and just endure the crying and fearful look on her face.

Actually our appointment was last week went extremely well. She followed all of the instructions by the dentist and opened her mouth wide, said “ah,” smiled, displaying all of her teeth and even showed her how to brush teeth. I was very impressed. Apparently, I was more fearful than Quinn was because after her appointment she told me, “Mommy, I love going to the Dentist! Can we come back tomorrow?” Every day, Quinn manages to surprise me. She really is growing up so quickly. I am hopeful that she will continue to love going to the dentist.

Al the best,

Tanya

Halloween’s Over: Now, the “trick” is figuring out what to do with all of those treats!

2015-11-13 16.17.35Though my daughter is only two and a half, she fully understands the concept of Halloween and was eager to go trick or treating this year. We actually had a few different outings, Boo at the Zoo, Please Touch Museum’s monster mash and actual trick or treating throughout the neighborhood. She could barely contain her excitement saying, “Oh yeah, I love Halloween! Look at all this candy!” In that moment, I was torn because as much as I enjoyed seeing that smile on her face and hearing that joy in her voice, I just knew we were going to have a problem. Either she was going to want to eat it all in one sitting, or she would be throwing major fits if I did not permit her to eat “her” candy.

As a parent and health conscious person, I always offer Quinn healthy, yummy fruits and rarely let her eat candy, but that doesn’t stop her from wanting it and asking for a lollipop in her sweetest voice with those big brown eyes, hoping to persuade me. Interestingly, Quinn has not been all that interested in eating the candy as much as she has been in sorting and counting it. Everyday since Halloween, she has asked, “Mommy, can I sort my candy please?” She especially likes sorting and counting how many lollipops or how many bags of Skittles she has (She’s never even had Skittles). With a handful of lollipops in her hand, she will ask, “Can you guess how many lollipops I have, Mommy?” Transferring them from one hand to the other, she proudly says, “I have, one, two, three, four, five, six lollipops!” I’ve even observed her sorting based on the colors of the candy wrappers. What a fun way to learn!

While I tend to not eat candy, this time of the year does bring out the “junk food junkie” in me, and as much as I try to resist, I do find myself taking a piece of candy here and there from Quinn’s bowl. With all of her counting and sorting, I have a feeling that she will eventually realize that some specific candies are missing. When she does, I will definitely have to fess up and let my candy accountant know that she’s caught me.

All the best,

Tanya

=

Mother May I? Yes, You May! My Toddler is Ahead of the Game!

Quinn Using Mommy's iPad after saying, "Mommy, may I use your iPad?"

Quinn Using Mommy’s iPad after saying, “Mommy, may I use your iPad?”

When I was younger, I loved to play the game “Mother May I?” However, today, with the lack of regard for standard English,  I do wonder if it is now called, “Mother Can I?” While I do appreciate the idea of the younger generation and even my generation becoming well-versed with slang, text language and abridged spellings of words, as an English professor and someone who sees the importance of knowing not only slang but standard English, I worry that standard English will be viewed as obsolete by my daughter and that it will impact her ability to thrive in school and the work force. With this in mind, I’ve been making a conscious effort to speak properly around my two and half year old so that she will mimic my speech and apply it when she is in a school or work setting as she gets older.

So far, it appears to be working because I’ve noticed that Quinn will often say, “Mommy, may I have some milk?” “Mommy, may we go to the playground?” or “Mommy, may I use your iPad?”Just hearing her say, “Mommy, may I…” makes me want to honor whatever her request may be with a proud, “Yes you may!” I hope she doesn’t catch on to how excited I am about this and try to use it to get whatever she “may” want.

All the best,

Tanya

Thanks to My Toddler, Our Super Grover Pumpkin Won the Contest!

Quinn at the Pumpkin Contest with Super Grover

Quinn at the Pumpkin Contest with Super Grover

Last week, I posted entries all about the autumn fun my two year old daughter and I have been having. One of them was about painting and decorating our pumpkin we got from our pumpkin patch excursion to look like Super Grover from Sesame Street. Initially, we just did it as a fun activity and selected Grover as Quinn’s favorite character, but then, my college sent out an advertisement for a pumpkin decorating contest, so I thought it would be wonderful to enter our pumpkin and for Quinn to come up to the school to see the other pumpkins too. I was not sure what to expect, but there were some great pumpkins that certainly gave our Super Grover some competition: a gumboil machine, tin man and cowardly lion and even a pirate ship. Quinn eagerly pointed to all of the different pumpkins and was really fascinated by the one right next to ours which was a huge carved pumpkin that she referred to as the scary one winking at her. Though I was nervous about where would we place in the contest, Quinn was just happy to be there. Actually, we managed to get first place for funnest pumpkin and won a $50 gift card, which was a great surprise. It felt so nice to have our hard work acknowledged. I am already excited about what we may do next year and looking forward to this becoming a tradition for Quinn and me.

All the best,

Tanya

Halloween Fun with Mother and Daughter Doc McStuffins and Lambie Costumes

Doc McStuffins and Lambie/Mother and Daughter Costumes

Doc McStuffins and Lambie/Mother and Daughter Costumes

Mommy and Quinn Lambie and DocI truly do enjoy having a child; one reason is because we have formed such a special bond in such a short duration of time. Another is that she brings out the child in me. While some people stick up their noses at the idea of parent and child dressing alike or think it’s corny, I’m one of those mothers who loves having coordinating outfits with my daughter. They usually are not identical, but there is a color theme or character theme uniting them.

Halloween is an excellent opportunity to display that mother/daughter bond. Last year, Quinn and I were super heroes to get the most out of the costumes from her first birthday party with a super hero theme; she was Super Quinn, and I was Super Mom. This year, Quinn wanted to be Doc McStuffins, so I, of course, had to be Lambie, Doc McStuffins’ helpful stuffed toy lamb and friend. Yesterday, Quinn and I went to The Please Touch Museum’s Halloween Monster Mash Bash donning our costumes. Though we spotted two other Doc McStuffins, we were the only Doc and Lambie duo and received several compliments on our costumes; there were even a few people who asked if they could take a picture of us.

While I was able to find and purchase Quinn’s Doc McStuffins costume at a local Halloween store, with a 20 percent off coupon of course, mine was not as easy. I did an online search for a lamb and even a sheep costume but only found costumes for young children. Then it occurred to me, I’m crafty and love special projects; why not create my own costume? Since I received so many compliments on my Lambie costume, I figured I share what I did to create it if you are in a similar situation.

Firstly, I purposely selected clothing items that I could potentially use in the future so that I could justify spending money beyond what I anticipated to make the costume.

Target was actually my “go-to” store for most of my outfit. I purchased my knitted hat for $14. The lamb faux fur vest, which was the most costly item at $34.99, a long sleeve white shirt for $8 and pink tutu socks for $2. (Though the total is $59, I had a $5 gift card and saved $3 more by using my Target debit card for a total of $51)

Amazon was my other “go-to.” I ordered my white fleece tights for $11.99 through them and a pair of white yoga pants for $14.95 as a back-up since we have a few outings lined up, and know I will wear them in the future. Though I liked the fit of the yoga pants better because of my height, (I am about 5′ 11”) I opted to wear the tights, which are for a woman of average height, to the Please Touch Museum because they went better with the tutu socks and were fitted around the ankle instead of loose. I also ordered my pink tutu through Amazon, which was far cheaper than getting it from one of the Halloween or party stores for just $10.

To pull the rest of the costume together, I ordered the lamb ears and tail through an Etsy business, TechnicandyLand for $14. They were good quality and had clips so that I could easily attach them onto my beanie hat or even clip them to my hair if I wished. I used elastic crotchet hair bands from AC Moore for just $1.50 for my wrists (Initially, I intended on doing this for my ankles too but just did not have enough time, so I purchased the socks) and didn’t have to purchase tulle because I had plenty left over from previous projects to make the tutu sleeves along with the signature pink bow Lambie wears, but the cost is usually around $3 or $4 or even cheaper if you have a 50 percent off coupon, which I usually have for AC Moore or Michaels.

In regard to making up my face, I used make-up that I already had available rather than buying a face paint kit.

In adding up the total cost, it’s a little over $100, which certainly is more than I would be willing to pay for a costume at a Halloween store, but when I minus out the clothing I will still wear after Halloween or without it being a special event, the total remaining is about $20. I actually purchased a faux vest for my daughter to wear on one of our coordinated “theme” dressing days. Also, the fun I got from putting together this costume and getting input from Quinn made it all worth it.

All the best,

Tanya

Autumn Fun with My Little One (Part Six) Creating Super Grover the Pumpkin!

Making a Super Grover Pumpkin with Quinn

Making a Super Grover Pumpkin with Quinn

One of my first entries this week was about having autumn fun with my two year old daughter involved going to a pumpkin patch. She had a great time, happily selected her pumpkin and probably had no idea that we would be decorating it. But when I asked, she knew exactly what she wanted: a Grover pumpkin. Some months back, I did a post on how Quinn likes Elmo but absolutely loves Grover from Sesame Street. So of course, this was who came to mind when I asked her how she wanted to decorate her pumpkin. I was excited to do this project with her because it hadn’t decorated a pumpkin since I was a child myself, but I had to give some thought about how we were going to do this special project.

First, we needed the materials for the basic Grover. They are as follows:

  1. Blue acrylic paint and black acrylic paint (I purchased them from AC Moore using a 50 percent off coupon)
  2. A pink sponge clown nose to resemble Grover’s (Since it’s near Halloween, this was easy to find at Party City for about a dollar)
  3. Jiggly eyes (I purchased these from AC Moore but later saw them at the local Dollar Tree where I would have saved a dollar off of the total)
  4. A red pipe cleaner for the mouth (I actually had one available and didn’t need to purchase it)
  5. Cardboard to make Grover’s body (I used a box I had lying around from an online purchase)
  6. A Sharpee for tracing body parts
  7. Scissors to cut the body
  8. Hot glue and hot glue gun to adhere the eyes, nose, and mouth
  9. Paint sponges brushes and a cup to hold the paint (I had some from a previous project)
  10. A ruler or tape measure

When Quinn saw the progress we were making, she asked if we could make Super Grover. So Super Grover the pumpkin became. I just needed to figure out how to do it and what additional materials I would need.

  1. Card stock or thick scrap book paper (I got this at AC Moore with a coupon too, so I only paid 25 cents.)
  2. Aluminum Foil (I had this available)
  3. One gray felt sheet, one red felt sheet and one yellow felt sheet (Purchased at AC Moore)
  4. Marker for tracing the red letter G and the yellow lightening bolt (I used a fine point Sharpee that I already had)
  5. About ten paper fasteners (I actually had from a project years prior)
  6. Regular glue that dries clear (I already have tons)

Between work, chores and other activities with Quinn, making our pumpkin into Super Grover certainly was not a one day project. It spanned over two weeks: one week for painting the pumpkin and adhering the facial features and the second week for transforming Grover into Super Grover and giving him a body, G, lightening bolt and cape.

Something that I’ve always been good at is looking at a picture or sample and recreating it. Since Quinn has both Grover and Super Grover, I was able to use them as models for doing the pumpkin. Here are the steps I followed, but this was my first time, so feel free to modify them if you want to try to create your own Grover:

  1. Using the sponge brushes, Quinn and I painted the entire pumpkin, minus part of the bottom because the top had to dry first. Though the paint dries within an hour, I waited a few hours and then retouched any areas where orange was still showing. After the pumpkin dried over night, we did one more coat and then made sure to paint any parts on the bottom that were still orange.
  2. After the pumpkin was blue, I used Grover as my model and then measured the size of my pumpkin to determine how far apart the eyes, nose and mouth should be from one another. Then, I marked the locations and painted on the black mouth which I let dry for a few hours and then added a couple of more coats.
  3. After the pumpkin was blue with the black mouth, I used my hot glue gun and glue to adhere the jiggly eyes, pink sponge nose and the red pipe cleaner mouth.
  4. Voila, you have Grover!
  5. To turn Grover into Super Grover, I looked at the helmet of Quinn’s Super Grover doll to get an idea of how it was constructed. I then stumbled across a Super Grover helmet template from Sesame Street’s web site which was very helpful in creating the helmet. Once I saw this, I was able to determine how many sections would be needed. I did five: one for the face mask, two for the temples that wrap around the head, one for the little piece on the front of the face mask and one for to cover the circumference of the head, which I measured with measuring tape.
  6. After figuring out the size of the pieces I would need, I traced them out using the scrap book paper (with the exception of the piece to cover the circumference of the head which was gray felt and left for the last part), cut them but left a little extra paper for the two pieces to wrap around the temple so that I could double check my measurements by putting it around the actual pumpkin. Then, I covered them with aluminum foil and used a little glue to make sure the foil stayed on the paper. The paper fasteners were used to hold the helmet together and to add the felt which would cover the head. Of course, we put the helmet on Super Grover the Pumpkin’s head to make sure it would fit, and it did!
  7. Then it was time to make Super Grover’s body. Once more, I looked at the model and viewed a few pictures online to get an idea of the body proportions and then used cardboard from an old package box and a Sharpee to draw the torso, arms and legs with some of Quinn’s help (I actually used one piece for the legs but cut a triangular shape in between so that presence of the two legs were obvious. Once I cut out the body parts, I used more of my trusty paper fasteners to connect the arms and legs to the torso.
  8. My daughter actually did most of the painting with the body of Super Grover with some of my help in going over any areas she missed. We then let the one side dry for a few hours and then did the other side.
  9. While Super Grover’s body was drying, we got to work on his red letter G, yellow lightening bolt and red cape using the felt sheets. This also involved looking at the model Grover, measuring the torso of Super Grover and then tracing out the appropriate pieces.
  10. Once our trusty super hero was all dry, about a few hours later, we were able to add the lightening bolt and G with a little regular glue and then the red cape with a little glue.
Quinn and her Super Grover and Super Grover the Pumpkin

Quinn and her Super Grover and Super Grover the Pumpkin

We just finished earlier today, and Quinn was so excited asked, “Can we take a picture with my two Super Grovers?” Of course, I was happy to oblige. Yes, this project was quite involved, but it was a wonderful opportunity to do something fun and special with my little girl. There’s actually a decorative contest at my job next week, and I am thinking that Quinn and I should enter it. How awesome would it be for our Super Grover to win!

All the best,

Tanya

Autumn Fun with My Little One (Part Five) Let’s Make Like a Tree and Leave, Leaves!

Quinn Loves Raking Leaves

                                 Quinn Loves Raking Leaves

All this week, I’ve been posting blog entries about the autumn fun my two year daughter and I have had thus far this season. While going to a pumpkin patch, the zoo for a little trick-or-treating and putting on a festive Halloween outfit have all been fun; there’s one activity we just did that may not necessarily be delightful for adults but certainly is for most young children. It can be labor intensive and sometimes feel never-ending for some adults; it’s raking leaves! Yesterday, as we were returning from The Little Gym, and going up the steps to our home, my daughter turned to me and said, “Look at all these leaves, Mommy! We have to clean up all these leaves! Please!” Wow, now that is delightful: a child who is eager to help do a chore. I promised Quinn that we’d clean up the leaves today when I got home from work, and she was elated. It actually was the perfect day for raking leaves: a comfortable 77 degree autumn day. While I had the big rake, Quinn had her little rake helping to build up the pile of leaves. “Oh boy; that’s a huge pile of leaves,” she said with jubilation as she got ready to jump in the leaves. Unlike last year, when she threw the leaves everywhere, she actually tried to keep them all in the pile together. After about an hour, she was ready to call it a day, but she had a great time. When my husband came out on the porch to see how she was doing, with a big smile on her face, she screamed out, “Daddy, I was working! Look at all those leaves in the huge pile!”

Let’s hope this activity continues to be fun as Quinn gets older and that she holds on to that excitement when she rakes up that “huge” pile of leaves.

All the best,

Tanya

Autumn Fun with My Little One (Part Four) Festive Style of Dress for Halloween

2015-10-10 08.23.39-1This week, I have been posting blog entries about the autumn fun my daughter and I have been having. While I have discussed activities, such as going to a pumpkin patch, making a scary pancake and going to the zoo for some trick-or-treating fun, there’s one activity that is tons of fun for my daughter yet does not require much. It’s simply being festive. For my daughter’s first two years of life, I have purchased cutesy outfits for her to wear for different holiday seasons, such as Easter, Christmas and even Saint Patrick’s Day. Halloween is no different, but this is the first year that Quinn actually picked out her own outfit. Months before October arrived, we were shopping in Burlington Coat Factory (who has some good deals and finds, by the way) she asked, “Mommy, can we get the Halloween shirt with Dora? I love Dora!” I was first taken aback that she knew about Halloween and then did not hesitate to say yes and imagined how cute she would look in the shirt. Then, when were in another store, Target, Quinn actually remembered what her shirt looked like that we purchased a couple of months prior and said, “Mommy, these pants match my Halloween Dora shirt!” I was could not believe that she remembered, and could not resist purchasing them to go with a jean skirt she already had. Quinn was so excited when she got to wear her outfit and asked me to take her picture. She even did a little dance singing, “Halloween!.” I just love how she is into the Halloween festivities. It gives me a chance to be “into them” again.

All the best,

Tanya

Autumn Fun with My Little One (Part Three) Boo at the Zoo

Quinn Riding a Camel at the Zoo

Quinn Riding a Camel at the Zoo

I just love the month of October, and not just because my birthday is October 11th but because it’s a month full of fun activities for my two year old daughter. During the summer, I posted an entry about how much fun Quinn has at the Philadelphia Zoo. That fun is magnified for two weekends in October as Quinn is able to not only see lions, giraffes, zebras and monkeys (and many more animals) but little robots, aliens, dragons, doctors and several famous characters from some of her favorite shows.
This past Saturday, Quinn and I got our money’s worth from our zoo membership and attended the Boo at the Zoo event along with several other families and children. Though we went last year, Quinn was not fully aware of the concept of children wearing costumes, but this year she giddily pointed out every character she recognized. “Mommy, there’s Minnie Mouse! Look, I see a princess! Oh, there’s another Minnie Mouse. That’s two!” Also, Quinn was able to practice saying, “Trick or Treat” at the different stations where she received candy. (Which she rarely has but was excited to have put in her bag). I was so proud of her for putting her shyness aside and saying “Trick or Treat” and “Thank you” without me prompting her to do so. This certainly was a great trial run. On top of trick or treating, Quinn and I both enjoyed craft activities, riding on the carousel, a draft horse and a train. Since the weather was brisk, the camel was a bit temperamental, so only children were permitted to ride. At first, I was a little nervous about Quinn being on the camel by herself, but she put on her serious face, held on like a big girl and told me she had fun riding the camel. If you are in the Philadelphia area, the Boo at the Zoo event continues this upcoming weekend, October 24th and 25th. It is fun for the entire family, and I highly recommend it if you are looking for an alternative to taking your child or children trick or treating or are just looking for another outing for full of fun activities.

All the best,

Tanya

Autumn Fun with My Little One (Part Two) Scary Pancake Face at IHOP

Quinn's Scary Face Pancake at IHOP

Quinn’s Scary Face Pancake at IHOP

Now that summer has officially drawn to a close, and we are well into autumn, I’ve been looking for fun activities for my daughter. Going out to eat is a special treat she enjoys, but she can be finicky with her eating habits. One place we can rely on is IHOP for pancakes, so this past Friday, we went to the location in Jenkintown, PA, which is just a few miles up the road. Who would have thought that we would have stumbled upon some autumn fun as a part of our dining experience? With Halloween approaching, IHOP is offering a special for children under twelve to decorate their own scary face pancake, which Quinn was very eager to do.  As this activity put a smile on her face, it put smiles her father’s face and mine too because, as a bonus, the meal is free on Fridays for children. She knew exactly how she wanted to design her scary face pancake and was even hesitant to eat it because she didn’t want to destroy its face. We even took a portion of it home, and she sadly exclaimed, “Oh no! My pancake’s scary face is ruined! Can we make another?” Of course,  I am happy to oblige and looking forward to making some more scary face pancakes in the days and weeks to come.

All the best,

Tanya